Thursday, 10 October 2013

Create Log file for JAVA Server Applications.


Step:1
 
Save as log4j.properties in project folder
# Root logger option
log4j.rootLogger=INFO, file
 
# Direct log messages to a log file
log4j.appender.file=org.apache.log4j.RollingFileAppender
log4j.appender.file.File=C:\\blazeds-turnkey-4.0.0.14931\\tomcat\\log\\license.log
log4j.appender.file.MaxFileSize=1MB
log4j.appender.file.MaxBackupIndex=1
log4j.appender.file.layout=org.apache.log4j.PatternLayout
log4j.appender.file.layout.ConversionPattern=%d{yyyy-MM-dd HH:mm:ss} %-5p %c{1}:%L - %m%n

File=C:\\blazeds-turnkey-4.0.0.14931\\tomcat\\log\\license.log
In this path license log is created. 
 
Step 2:
Download log4j.jar

Step 3:
  Logger log = Logger.getLogger(getClass()); must be included in All Java Classes.
 getClass()=current class

        log.info("Username : "+uName);
        log.info("Password : "+pwd;
Username and Password are printed in log file.

Step4:
Levels of Log4j Properties:
  • TRACE
  • DEBUG
  • INFO
  • WARN
  • ERROR
  • FATAL
  • ALL

    In step1:
    We have placed

    log4j.rootLogger=INFO, file
     
    info by which WARN,ERROR,FATAL,ALL will be covered above TRACE,DEBUG wont be covered.
    If we place Trace all properties will be covered.

Thursday, 3 October 2013

A Few Intuitive Tricks All The New iOS 7 Users Should Know

Swipe Down For Search:

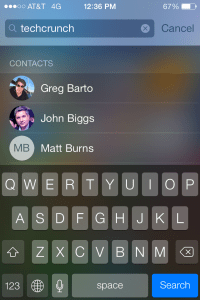
searchGone are the days of having to swipe or tap your way to iOS’ dedicated search page. You can now access Spotlight search from anywhere on the home screen. Just swipe down in the middle of the screen.
You can use Spotlight to quickly search across your device’s apps, emails, and contacts — but curiously, it seems that Apple has removed Spotlight’s ability to search the web. I’m pretty sure I never actually used that, but this is the Internet so I’m supposed to complain now that it’s gone.


Swipe Up For Toggles:


Toggles! At last!


control panel
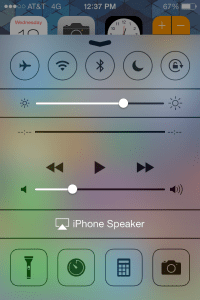
Fixing what is perhaps one of iOS most glaring, long-lasting omissions, iOS 7 puts one-click access to things like Airplane mode and Wi-Fi/Bluetooth toggles just one swipe away, instead of hiding them in settings.
To get to the new Control Panel, just swipe up from the bottom of the screen anywhere you might be. You’ll get buttons for Airplane mode, Wi-Fi, Bluetooth, Do Not Disturb, Orientation lock, and sliders for brightness and media control. Oh, and there’s a flashlight in there. So if you were thinking about building a dedicated flashlight app, now is probably not a good time.
(Pro tip: The control panel is available from the lockscreen. Also: if the control panel is sliding out and interrupting your Candy Crushin’ time, you can block it from sliding out while in an app in your settings.)

Reveal iMessage and SMS Timestamps:


timestamp
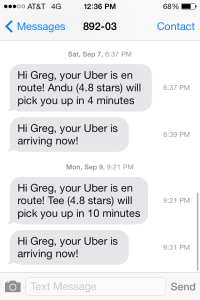
iOS has always been kind of weird about telling you when a message was sent or received. It’ll tell you when some messages came through — but only if it’s the first one that’s come through in a while in a given thread. If you sent a bunch of messages around 12:45, for example, you’d normally only get that first 12:45 timestamp.
With iOS 7, you can reveal the timestamp for each and every message. Just grab one of the speech bubbles in a thread and swipe to the left. Tada! Timestamps! Never argue about exactly when a message was sent again! (Because, yeah, I’ve had those arguments. Seriously. Sigh.)


Built-In Level:

level
Building a house boat? Hanging a picture? Just want to show off one of the stranger new tricks that your iPhone has picked up?

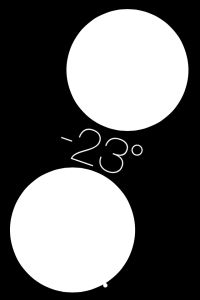
iOS 7 has a built-in bubble level, of all things. I thought it was a pretty strange addition at first… but then I found myself using it one day. Then again the next.
To get to the level, open the compass app. Though not immediately obvious, there’s a second page to the app; swipe to the left, and you’ll be at Apple’s level.
(Pro tip: Double-tapping the screen resets the level to consider whatever angle the phone is currently at to be 0°. That design choice, expressed through a series of colored flashes, isn’t super intuitive.)


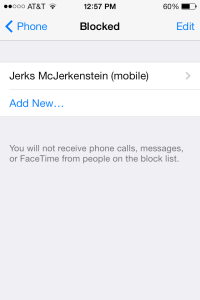
BlockedCall/SMS/Facetime Blocking:

“Surely, there’s got to be a way to block phone numbers,” said every iPhone user ever.
Really, just type “How to b” into Google and let it autocomplete. First result? “How to block a number.” Second result? “How to block a number on iPhone.” Third result? “How to be happy.” This feature is in greater demand than happiness! Happiness!
Yet, until now, there hasn’t really been an easy way.
With iOS 7, it’s finally a pretty straightforward process to block people from calling, messaging, or FaceTime-ing (FaceTiming? Facing? Agh.) you. You can find the block list at either Settings > Phone > Blocked; Settings > Messages > Blocked; or Settings > FaceTime > Blocked. Note, however, that the block list is universal — block them in the phone settings, and they’re blocked on FaceTime, too.


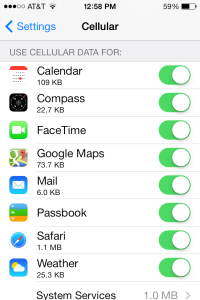
App-By-App Cell Data Usage/Blockage:

Cell
Want to see which app is using up all of your cell plan’s precious megabytes? Want to keep Pandora from streaming unless it’s on Wi-Fi?

Pop into Settings > Cellular and scroll down to the bottom. You can see which apps have used the most cell data and block any app from using cell data at all. (Note: An app needs to have used cell data at least once for it to show up in the list.)


How To Close Apps:

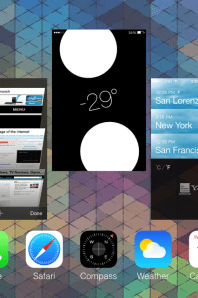
photo We’ve had a bunch of requests for this one since this post first went up, so here you go.
Apple changed the App Switching/App Closing mechanism up a bit with iOS 7. It used to be that to close an app, you’d double tap the home button, wait for the app drawer to slide out, then press and hold on an icon until the little “X” appeared.
With iOS 7, the whole thing looks and works a bit more like webOS of yesteryear. Double tap the home button to bring up the fullscreen app switcher, which provides a screenshot of each running application in a sideways-scrolling carousel. To close an application, simply swipe the app’s screenshot up and off the screen.
(Note: You really shouldn’t need to close apps all that often. Unless the app has crashed and refuses to fix itself or it’s doing something that is eating your battery, iOS 7 is designed so that most apps use little to no resources when in the background.)


Adobe Gets Hacked.

Adobe has just disclosed that one of their servers has been hacked.

While their investigations are still ongoing, Adobe has shared a few details on what they believe could have been accessed and obtained in the hack — and it’s a big one.

From what Adobe has shared so far, it sounds like the hackers had access to encrypted data for as many as 2.9 million customers. While Adobe stresses that the data is encrypted and that they “do not believe the attackers removed decrypted credit or debit card numbers”, that data — encrypted or not — is definitely not something they want out in the wild.


Adobe has yet to disclose how that data was encrypted, so it’s currently unclear just how secure it is.

Meanwhile, it also appears that the hackers may have been able to access the source code for at least three of Adobe’s products: Acrobat, ColdFusion, and ColdFusion Builder. This goes hand in hand with a report from Brian Krebs this morning, who noted that he and a fellow researcher had discovered at least 40GB of Adobe source code available on a hacking group’s private server.
Beyond the obvious business implications of having your otherwise locked down source code floating around in the wild, there are potentially massive security concerns here. Once you’ve got the source code for an application in hand, it becomes much easier to dig up the stealthy Lil security screw ups that might otherwise go unnoticed. Combine this new potential for big zero-day exploits with the many, many millions of Adobe Acrobat (Adobe’s official PDF reader) installs around the world, and this all starts to get pretty worrisome.

How to protect Licensed softwares from system date-time changes?

Step 1: Create trial_tracker entry in an encrypted format in a windows registry and in file.

Step 2: Assign app install timestamp ( yyyy-mm-dd-hh-mm-ss ) to trial_tracker.

Whenever app starts, check if current system timestamp is greater than trial_tracker and less then expected expiry date.
  •     If yes, update trial_tracker to current system timestamp and continue.

  •     If no, trial_tracker has been tampered or trial time expired. Ask user to purchase full version or exit.
Note: User can get away with this by deleting windows registry entry and encrypted file.( if he is able to find them ). In such case, further checks can be added. For example create secondary windows registry entry which checks for existence of primary registry and encrypted file.

Friday, 27 September 2013

Android 4.4 KitKat New UI.

All of now know what Google has named the next version of its Android system, its KitKat. But what has been a secret so far is about the features that will come with this chocolaty android version. Screenshots of the Android 4.4 aka KitKat has surfaced online which shows the dialer screen and a new messaging interface.


New messaging application altogether rather than just being a new UI of the existing setup. The  Screenshot shows the controls of app on the top right corner and the color scheme is similar to that of What’s App. The secondscreen shot on the other hand shows a clean layout of the dialer which flaunts a blue color.

The Android 4.4 KitKat may arrive with next Nexus Smartphone which apparently will be called as Nexus 5 in the month of October.

Thursday, 26 September 2013

Scheduled Tasks With Cron(QUARTZ).

To configure regularly scheduled tasks that operate at defined times or regular
 intervals. 
These tasks are commonly known as cron jobs. Quartz is a open source job scheduling framework,
 that let you scheduler a task to run on a predefine date and time.

When a Quartz application is first launched,the main thread starts the Scheduler.
The QuartzScheduler is created and creates an instance of the  
 org.quartz.core.QuartzSchedulerThread class.The QuartzScheduler Thread contains the processing
 loop for determining when the next job should be triggered.As the name implies,the 
QuartzSchedulerThread is a Java thread.It runs as a nondaemon thread with a normal priority. 
 
When first Tomcat server is on  "Initializing Scheduling PlugIn" will be printed then 
when we schdule the task it will be executed on that particular time.
 
InitializeServlet.java 
package com.cron;

import javax.servlet.ServletException;
import javax.servlet.http.HttpServlet;

public class InitializeServlet extends HttpServlet {

 public void init() throws ServletException {
        try {
        System.out.println("Initializing Scheduling PlugIn");
       CronScheluder objPlugin = new CronScheluder();
    }
    catch (Exception ex) {
      ex.printStackTrace();
    }
  }
}
CronScheluder.java
package com.cron; import org.quartz.CronTrigger; import org.quartz.JobDetail; import org.quartz.Scheduler; import org.quartz.SchedulerFactory; import org.quartz.impl.StdSchedulerFactory; public class CronScheluder { public CronScheluder() throws Exception { SchedulerFactory sf = new StdSchedulerFactory(); Scheduler sche = sf.getScheduler(); sche.start(); 
    // MyJob class will be executed at given interval. 
    JobDetail jDetail = new JobDetail("Scheduling", "NJob", MyJob.class);
    //"0 0 12 * * ?" Fire at 12pm (noon) every day
    //"0/2 * * * * ?" Fire at every 2 seconds every day
   CronTrigger crTrigger = new CronTrigger("cronTrigger","NJob","0 0 12 * * ?");
    sche.scheduleJob(jDetail, crTrigger);
  }
}
 
MyJob.java:
 
package com.cron;
import org.quartz.Job;
import org.quartz.JobExecutionContext;
import org.quartz.JobExecutionException;

public class MyJob extends BaseHibernateDAO implements Job {

    public void execute(JobExecutionContext context)
     throws JobExecutionException {

        System.out.println("Cron executing "); 

    }
}
 
If we want to run Quartz parallel to the main thread 
 
CronScheluder.java 
import org.quartz.CronTrigger;
import org.quartz.JobDetail;
import org.quartz.Scheduler;
import org.quartz.SchedulerFactory;
import org.quartz.impl.StdSchedulerFactory;

public class CronScheluder extends Thread{

public void run(){
 try{
 SchedulerFactory sf = new StdSchedulerFactory();
 Scheduler sche = sf.getScheduler();
 sche.start();
 JobDetail jDetail = new JobDetail("Newsletter", "NJob", MyJob.class);
 //"0 0 12 * * ?" Fire at 12pm (noon) every day
 //"0/2 * * * * ?" Fire at every 2 seconds every day
 CronTrigger crTrigger = 
        new CronTrigger("cronTrigger", "NJob", "0 0 12 * * ?");
 sche.scheduleJob(jDetail, crTrigger);
 // sche.shutdown();
}catch (Exception e) {

  e.printStackTrace();
             }
}
}
InitializeServlet.java 
 
  try {
        System.out.println("Initializing Scheduling PlugIn");
        CronScheluder objPlugin = new CronScheluder();
        if(!objPlugin.isAlive()){
   objPlugin.start();
        }
      }

Monday, 23 September 2013

How to call a Web Service For Cross Domain in FLEX


Step1: 
Set The Paths For the Java and Blazeds.
                 CATALINA_HOME: C:\blazeds-turnkey-4.0.0.14931\tomcat.
             Java Paths: 
                 Java_Home: C:\Program Files\Java\jdk1.7.0_03;
                 path: C:\Program Files\Java\jdk1.7.0_03\bin; 

Step2:
In  C:\blazeds-turnkey-4.0.0.14931\tomcat\Webapps  create a folder with a some name
And then go to samples folder copy WEB_INF folder in that folder and paste that WEB_INF folder in
Folder which you created.

Step3:
 WEB-INF must contain
classes,flex,jsp,lib,src folders and web.xml file.

Step4:
Create A project in  Flash Builder by selecting the Blazeds server with
                Root Folder:       C:\blazeds-turnkey-4.0.0.14931\tomcat\webapps\folder Name   
                Root URL:          http://localhost:8400/Webconfigfile\ folder Name  
                Context Root:    \ folder Name

Step5:
In Flex Application Declaration block
<s:WebService  id="WBSample"
                             destination="ws-catalog"
                             useProxy="true"
                             result="WBSample_resultHandler(event)"
                             fault="WBSample_faultHandler(event)"
 load="WBSample.CelsiusToFahrenheit(12)" />


Step6:
 In the folder which you Created open WEB_INF folder --> flex folder --> proxy-config file with notepad.
                In that set the destination tag like this below

<destination id="ws-catalog" 
 <properties>
<wsdl>http://www.w3schools.com/webservices/tempconvert.asmx?wsdl</wsdl>
 <soap>*</soap>
</properties>
 <adapter ref="soap-proxy"/>
 </destination>


  In that destination id and destination  attribute in Webservice tag should be same.  

                               Without server directly from flex:
 Step1:
In Flex Application Declaration block 
     <s:WebService id="wsSaveEmployee" 
wsdl="http://www.w3schools.com/webservices/tempconvert.asmx?wsdl
          showBusyCursor="true">
          <s:operation name="CelsiusToFahrenheit"
                   resultFormat="object"
                   result="saveChangePwdresult(event)" 
fault="saveChangePwdfault(event)"/> </s:WebService>
 Step2:
 CelsiusToFahrenheit is the method name in WebService.           
              wsSaveEmployee.CelsiusToFahrenheit.send(24);